Post-Processing: Workflow
As I mentioned in my 10 Guidelines for Shooting “All shots should be developed and then graded.”
I believe that responsible, artful photography involves reviewing the work, and digital developers (newly created in the scheme of things) are the key, especially when we’re talking about working through a 300-shot session.
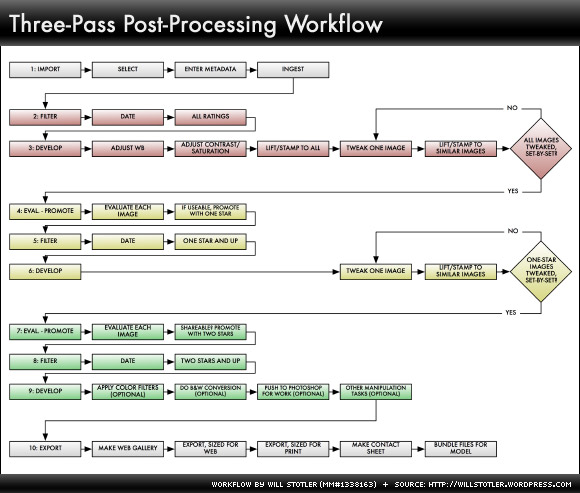
To understand more about what I mean, I’m providing a quick look into the full workflow that I’ve created and refined since 2006 and use for every shoot.
High-Throughput
The workflow is high throughput, meaning it is designed to let me work through a large batch of photos quickly (300 to 600), without making compromises. Because the workflow is efficient, I can often see and deliver my final, developed photos in no more than a few days after shooting. Because I shoot a lot, I have to have a workflow like this. My portfolio has benefitted, too. I imagine that working professionals use a similar workflow because time is money.
What is a “Digital Developer”?
Digital developers are applications that are specialized in performing the following tasks:
- Ingest image files
- Manage and store the ingested image files
- Provide detailed adjustments for images, including touchup work
- Permit “lifting and stamping” of adjustments from one image to many similar images
- Enable curating of images by ratings
- Can export in a variety of formats
- Permit easy searching, browsing, and filtering of images throughout the whole image library
- Provide storage and backup features
Popular Developers: Aperture and Lightroom
My developer of choice is Apple’s Aperture 2.1.4. (I refuse to upgrade to version 3.x because of its poor performance.) Adobe Lightroom is also very popular. Other developers, like Capture One, also exist. My description below refers to Apple’s Aperture, but the same basic principles apply when using Lightroom or Capture One.
The Workflow
This workflow can be performed quickly, efficiently, and is repeatable. Each step involves only a single, focused task performed across all images—which keeps me focused and sharp at all times. Additionally, grading-as-I-go shrinks the size of the batch as I work, letting me apply more effort and concentration on the images that deserve my complete attention while filtering out images that don’t. Last, every image is viewed multiple times, which puts me in a better position to curate effectively and deliver consistently good work. Nevermind that I think you have to develop and then grade images—I would never just grab just a few images and work on them straightaway. I would miss great shots that I couldn’t see until they were developed.
Download this graphic as a printable PDF.
Here are the steps:
- Import RAW images from the memory card into Aperture (apply copyright metadata at this stage).
- Filter images by calendar date so only the imported RAW images are visible.
- Review and delete all RAW images that are clearly “very bad” shots.
- Adjust white balance on one image. Lift+stamp to all photos. (Or, subset by subset if WB changed set-to-set.)
- Adjust contrast and saturation to taste. Lift+stamp to all photos. (Or subset by subset, as appropriate.)
- Adjust one, lift+stamp to many. Work more finely on a “subset by subset” basis with similar images, finding an ideal setting on one image then lift+stamping that to all images in that similar “subset.”
- Promote images, what I think are my best and all other “maybes” with one star.
- Filter images by calendar date and one star so only one-star images are displayed.
- Tweak one-star images, one-by-one and case-by-case, to pull the right look out of each image.
- Promote images, both your best and “maybes” that made the cut, with two stars.
- Filter images by calendar date and two stars so only two-star images are displayed.
- Treat selected images with B&W conversion in TrueGrain or with NIK filters. (Strictly optional.)
- Filter images by calendar date and to show one- or two-star images.
- Sharpen images with edge sharpening or regular sharpening.
- Create and then export Web Gallery.
- Export high-resolution and web-resolution shots.
Uh, What About Photoshop?
“Photoshop” is clearly the name that’s associated with post production (and also technical credibility) and it is expected to be used by many photographers, models, and others in the photography business. Photoshop was created to be used on an image-by-image basis and is the best game in town for image manipulation, complex image compositing, very complicated color handling, and myriad other “shop” type tasks. I’ve been using Photoshop professionally since Version 4 in 1997. But Photoshop is not the ideal tool to work through large quantities of images, performing modern image developing tasks. Image development software, like Aperture or Lightroom, new to the scene in 2005, is specifically designed to provide post-processing workflows. Photoshop is appropriate to be used after executing the workflow to prepare final, high-value images for printing/Web use, or to apply very complex touchups and effects. Otherwise, digital development coupled with good shooting practices is more than enough.


Leave a comment